Kitchen Organization Ideas to Transform Your Space
The kitchen is often called the heart of the home, but when it’s cluttered and disorganized, it can become a source of daily frustration rather than a gathering place of warmth and nourishment. Whether you’re dealing with overflowing drawers, chaotic countertops, or mystery containers in the back of your fridge, getting your kitchen organized can dramatically improve your cooking experience and your overall quality of life.
A well-organized kitchen saves you time, reduces stress, and can even inspire you to cook more often. Instead of hunting for that elusive measuring cup or digging through piles of plastic containers to find a matching lid, an organized kitchen puts everything you need right at your fingertips. The good news is that transforming your kitchen doesn’t require a complete renovation or a massive budget. With some creative thinking and strategic planning, you can create a kitchen that’s both beautiful and highly functional.
In this comprehensive guide, we’ll explore eight proven kitchen organization ideas that work for kitchens of all sizes and styles. From maximizing vertical space to creating custom storage solutions, these strategies will help you reclaim your kitchen and make it a space you truly love to spend time in.
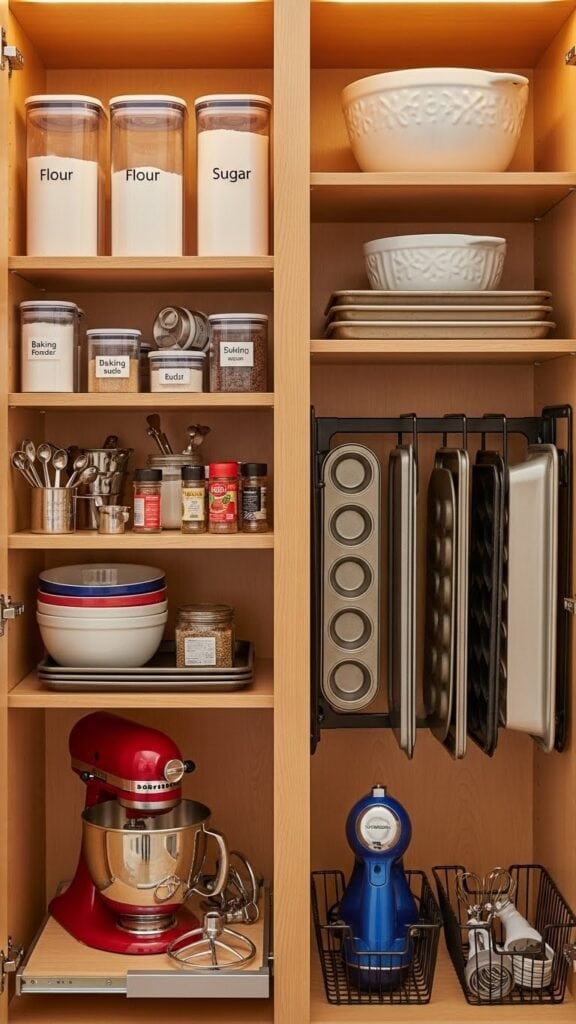
1. Master Your Pantry Organization for Maximum Efficiency
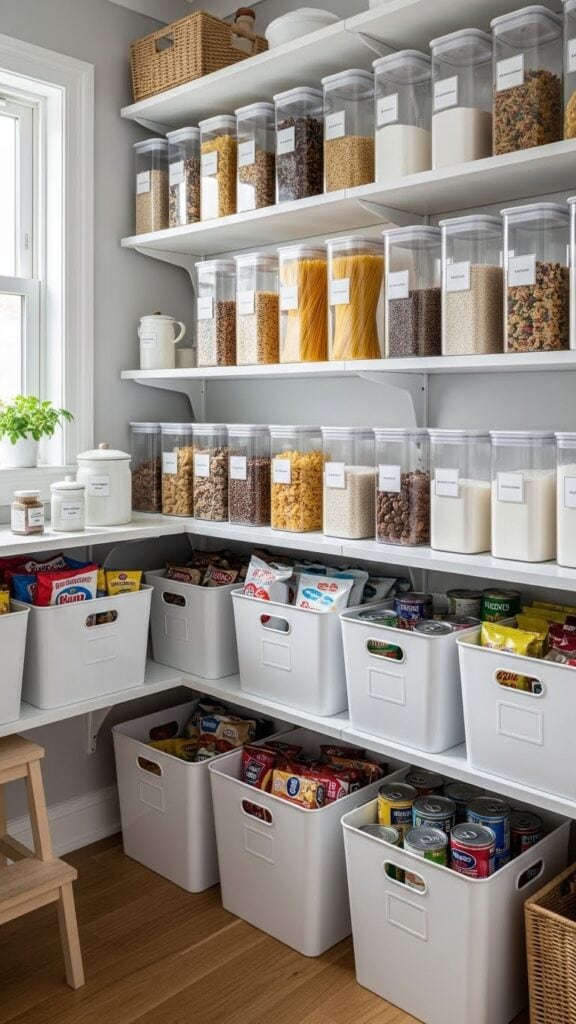
Your pantry is the backbone of your kitchen’s organizational system, and when it’s properly arranged, meal planning and cooking become infinitely easier. A well-organized pantry means you can see what you have at a glance, avoid buying duplicates, and actually use ingredients before they expire.
Start by completely emptying your pantry and checking expiration dates. You’ll likely be surprised by how many items have been lurking in the back, long past their prime. Discard anything expired, stale, or that you realistically won’t use. This purge is essential because you can’t organize clutter—you need to eliminate it first.
Once you’ve edited your pantry contents, it’s time to categorize. Group similar items together: baking supplies in one area, breakfast items in another, snacks in their own zone, and so on. This categorical organization means you’ll always know where to look for what you need.
Invest in clear, airtight containers for dry goods like flour, sugar, rice, pasta, and cereals. Not only do these containers keep food fresher longer, but they also allow you to see exactly how much you have left of each item. Label everything clearly—even if you think you’ll remember what’s in each container, labels eliminate guesswork and help other family members find things too. You can use a label maker for a polished look or simply use masking tape and a permanent marker for a budget-friendly option.
Utilize the vertical space in your pantry by installing additional shelving or using shelf risers. These handy organizers essentially create a second tier within your existing shelves, doubling your storage capacity. They’re particularly useful for canned goods and spices, allowing you to see items in the back without having to move everything in front.
Consider using lazy Susans for corner spaces or deep shelves. These rotating organizers make it easy to access items that would otherwise be difficult to reach. They’re perfect for oils, vinegars, sauces, and other frequently used condiments.
Don’t forget about the back of your pantry door—this often-overlooked space is prime real estate for organization. Install an over-the-door organizer with pockets or small shelves to hold spice packets, tea bags, small snacks, or other lightweight items.
For families with children, create a designated snack zone on a lower shelf that kids can access independently. Use bins or baskets to contain individual snack portions, making it easy for children to grab something on their own while keeping the rest of the pantry tidy.
Finally, implement a first-in, first-out system. When you bring home groceries, move older items to the front and place new purchases behind them. This simple rotation ensures you use items before they expire and helps prevent waste.
2. Revolutionize Your Cabinet Space with Smart Storage Solutions
Kitchen cabinets often become black holes where dishes, pots, and random kitchen gadgets go to hide. The key to functional cabinet organization is making everything visible and accessible, which means rethinking how you use the space.
Start with your lower cabinets, which are typically the most challenging to organize because of their depth. Pull-out drawer systems are game-changers for deep cabinets. These sliding shelves bring items from the back of the cabinet forward, eliminating the need to get down on your hands and knees to reach that stockpot you only use occasionally. While professional installation is an option, many pull-out systems are available as DIY-friendly aftermarket additions.
For pots and pans, consider vertical storage rather than stacking them. When you stack cookware, you inevitably need the pot on the bottom, which means pulling everything out to get to it. Vertical dividers or a pot rack organizer allow you to store pans on their sides, making each one easily accessible. This same principle works beautifully for baking sheets, cutting boards, and serving trays.
Maximize vertical space inside cabinets with shelf risers and stackable organizers. These create additional levels within your existing cabinet structure, effectively doubling your storage capacity. Use them for dishes, glasses, mugs, or food storage containers.
Install hooks on the underside of shelves to hang coffee mugs, measuring cups, or small baskets. This simple addition uses dead space and frees up valuable shelf real estate for other items.
For corner cabinets, lazy Susans are your best friend. These rotating platforms make it easy to access items in those awkward corner spaces that are otherwise difficult to reach. Use them for spices, cooking oils, or frequently used condiments.
Create a command center for food storage containers by designating one cabinet specifically for them. Store containers with their lids already attached, or use a lid organizer that keeps lids vertical and easy to grab. Consider investing in a set of nesting containers that stack efficiently when not in use.
Don’t overlook the toe-kick area beneath your base cabinets. This space can be converted into shallow drawers perfect for storing flat items like baking sheets, placemats, or even wine bottles in specialized toe-kick wine racks.
For upper cabinets, group items by frequency of use. Keep everyday dishes and glasses on lower shelves where they’re easy to reach, and reserve higher shelves for special occasion items or things you rarely use. Use uniform containers or baskets to corral smaller items and create a cohesive, organized look.
3. Create Custom DIY Kitchen Organizers on a Budget

You don’t need to spend a fortune on expensive organizing systems to transform your kitchen. With a little creativity and some basic materials, you can create custom DIY organizers that are both functional and uniquely suited to your space.
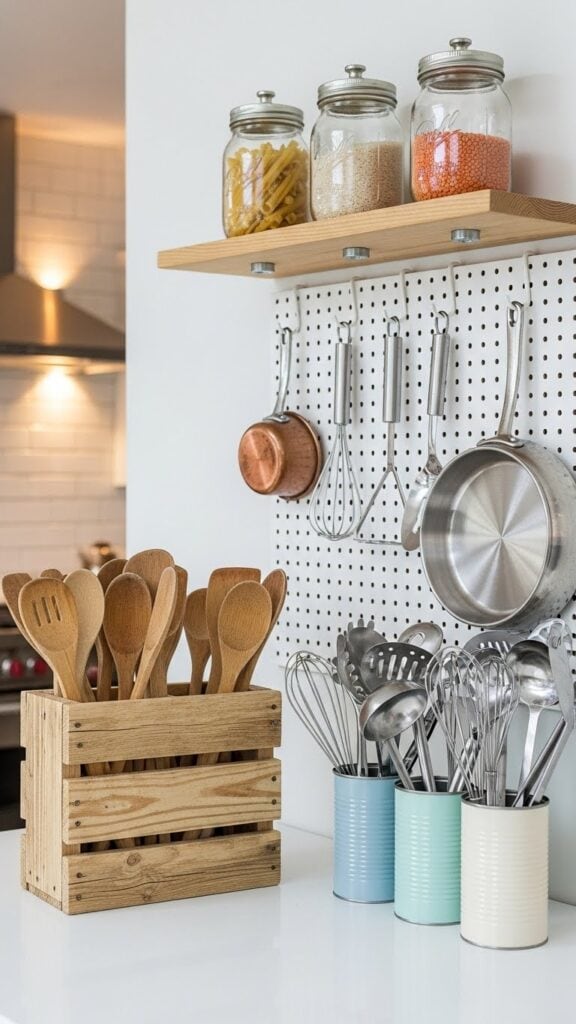
One of the simplest and most effective DIY projects is a pegboard organizer. Install a pegboard on an empty wall or inside a cabinet door, and you’ll have a customizable storage system for pots, pans, utensils, and tools. Paint the pegboard to match your kitchen décor, and use a combination of hooks, baskets, and shelves to create the perfect setup for your needs. The beauty of pegboard is its flexibility—you can rearrange the configuration anytime your needs change.
Tension rods are another DIY organizing secret weapon. Install them vertically in a cabinet to create dividers for baking sheets and cutting boards. Use them horizontally under the sink to hang spray bottles by their triggers. Place them inside deep drawers to keep items from rolling around. These inexpensive rods can solve multiple organizational challenges throughout your kitchen.
Repurpose everyday items into organizers with a little imagination. Magazine holders make excellent storage for aluminum foil, plastic wrap, and parchment paper boxes—simply place them on their side inside a cabinet or pantry. Use a dish drying rack vertically to store pot lids. Turn a wine rack on its side to organize water bottles or rolling pins.
Create drawer dividers from cardboard or foam core board. Measure your drawer, cut the dividers to size, and arrange them to create compartments for utensils, gadgets, or junk drawer items. For a more permanent solution, use thin plywood or balsa wood and secure the dividers with wood glue.
Mason jars aren’t just for canning—they’re versatile organizers for the kitchen. Attach the lids to the underside of shelves or cabinets with screws, then screw the jars into the lids to create hanging storage for small items like clips, rubber bands, or spice packets. Use larger mason jars to store dry goods, organize craft supplies, or hold utensils on the counter.
Build a custom spice rack using small wooden crates or boxes. Mount them to the wall in a stair-step pattern or side by side for an attractive display that keeps spices visible and accessible. Paint or stain the crates to match your kitchen aesthetic.
For a budget-friendly pot lid organizer, use a small file organizer or desktop paper sorter. These work perfectly to keep lids upright and separated, and they’re a fraction of the cost of specialty kitchen organizers.
Create a command center using a clipboard, cork board, or magnetic board to keep track of grocery lists, recipes, and schedules. Frame it with painted wood trim for a polished look, or leave it simple and functional.
The key to successful DIY organizing is measuring twice and customizing solutions to fit your exact space and needs. These homemade organizers can be just as effective as expensive store-bought versions, and they add a personal touch to your kitchen.
4. Maximize Your Small Space Kitchen with Clever Storage Hacks

A small kitchen doesn’t mean you have to sacrifice organization or functionality. In fact, small spaces often require more creativity, which can result in highly efficient and innovative storage solutions. The secret is to think vertically, use multi-functional items, and eliminate wasted space.
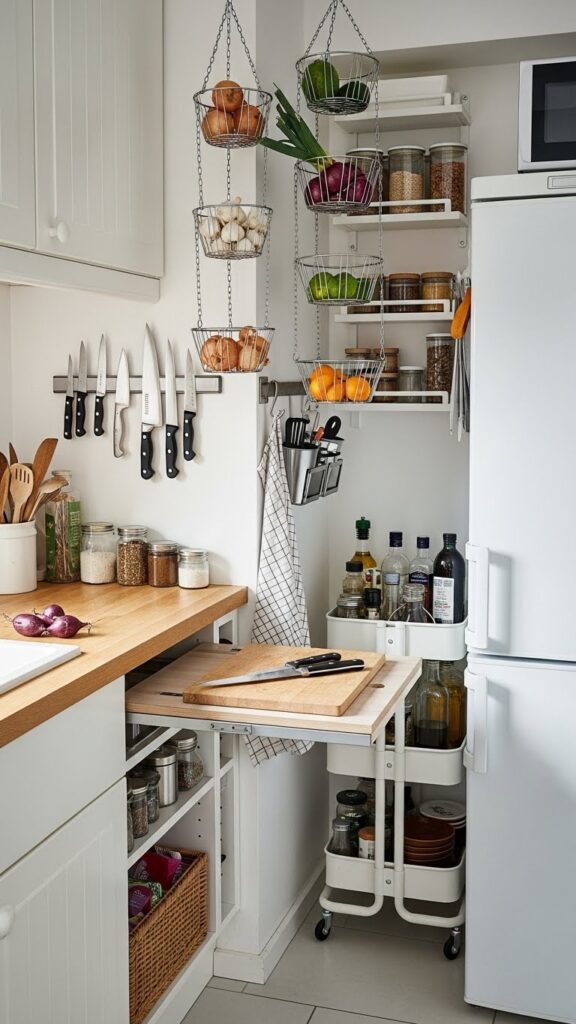
Wall-mounted storage is essential in a small space kitchen. Install a magnetic knife strip to keep knives off the counter and out of drawers. Hang a rail system with S-hooks for frequently used utensils, pots, and pans. Mount a paper towel holder underneath cabinets to free up counter space. Every item you can get off horizontal surfaces and onto walls creates more working room.
Invest in stackable and nesting items wherever possible. Nesting mixing bowls, measuring cups, and food storage containers take up a fraction of the space of non-nesting versions. Stackable cooling racks, cutting boards, and baking sheets store efficiently in tight quarters.
Use the inside of cabinet doors for additional storage. Adhesive hooks can hold pot holders, measuring spoons, or dish towels. Small wire baskets or pocket organizers can store spices, aluminum foil boxes, or cleaning supplies. This often-ignored space is valuable real estate in a small kitchen.
A rolling cart or kitchen island on wheels provides extra storage and workspace that can be moved around as needed. Position it near the stove while cooking, then roll it out of the way when you need floor space. Choose one with shelves or drawers to maximize its storage potential.
Consider furniture that does double duty. An extendable dining table can serve as both eating space and additional prep area. A bench with built-in storage can hold kitchen linens or small appliances while providing seating.
Utilize the space above your cabinets if you have it. While you don’t want to store frequently used items up high, this area is perfect for large serving platters, seasonal items, or decorative pieces that would otherwise take up valuable cabinet space.
Install a fold-down cutting board or table attached to a wall or the side of a cabinet. When not in use, it folds flat and disappears; when you need it, you have instant prep space without permanently sacrificing floor area.
Use clear containers and labels obsessively in a small kitchen. When you can see exactly what you have and where it is, you avoid buying duplicates and wasting precious storage space on items you already own.
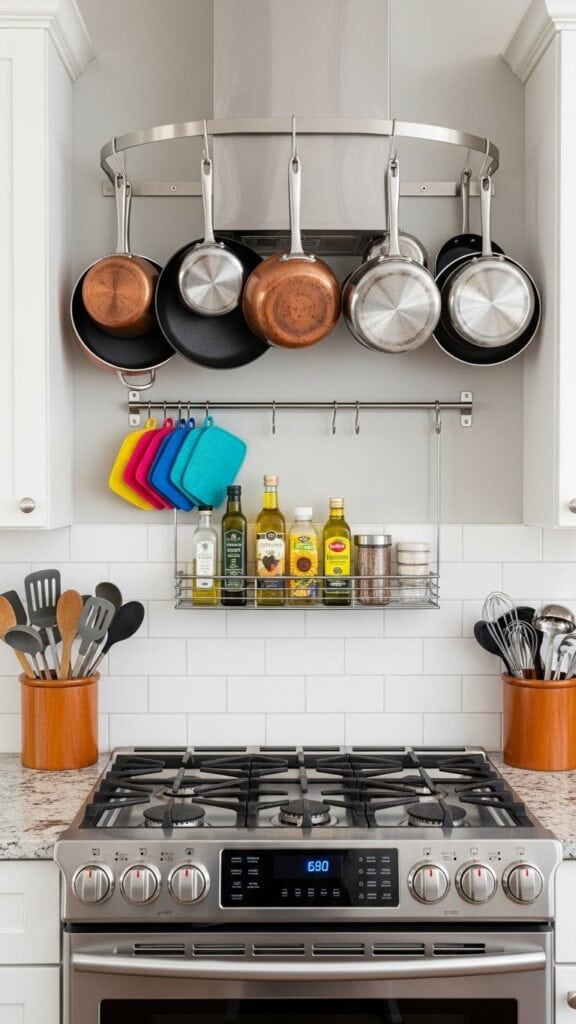
Hang a pot rack from the ceiling if you have the clearance. This classic solution removes bulky cookware from cabinets and makes a design statement while being highly functional. Choose one with a shelf on top for even more storage.
Embrace appliance garages or designated appliance cabinets. Rather than leaving countertop appliances out all the time, create a cabinet space where they can live when not in use. Add a pull-out shelf or lift mechanism for heavy items like stand mixers so they’re easy to access without permanent counter placement.
Finally, be ruthless about what you keep in a small space kitchen. Every item should earn its place by being frequently used or deeply loved. Donate duplicate tools, single-use gadgets you never use, and anything broken or worn out. The less you have, the easier it is to keep your small kitchen organized and functional.
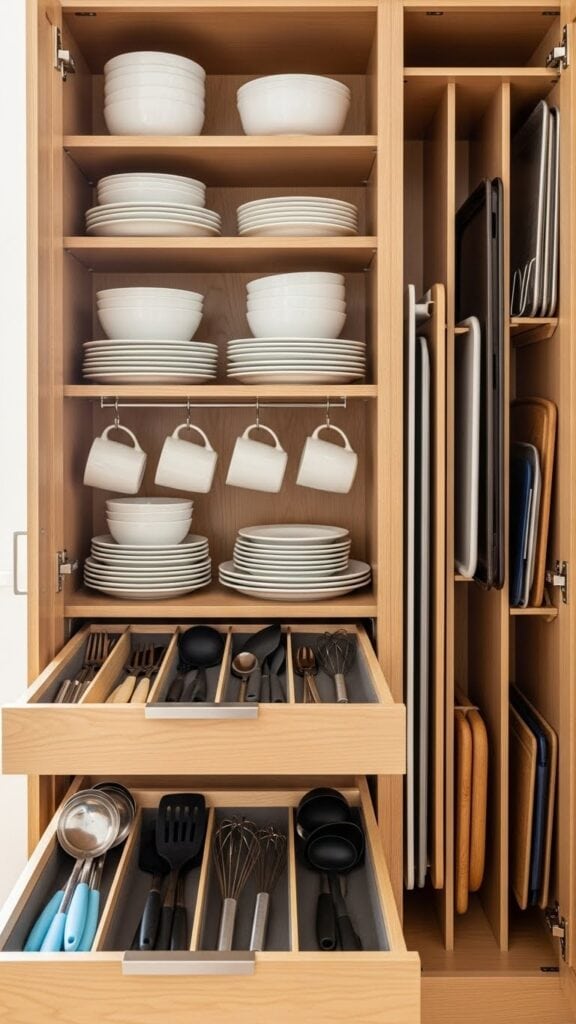
5. Implement a Drawer Organization System That Actually Works
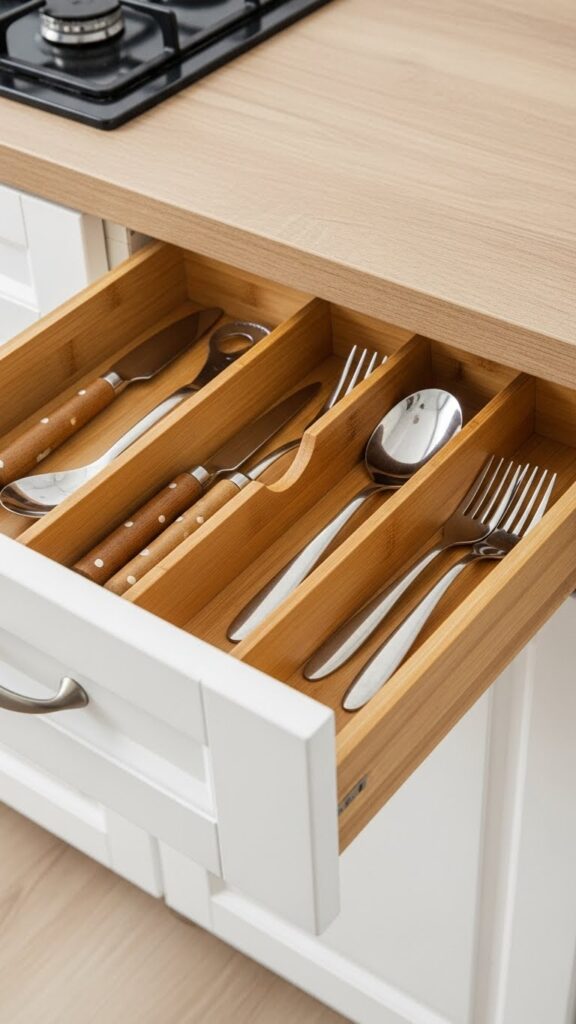
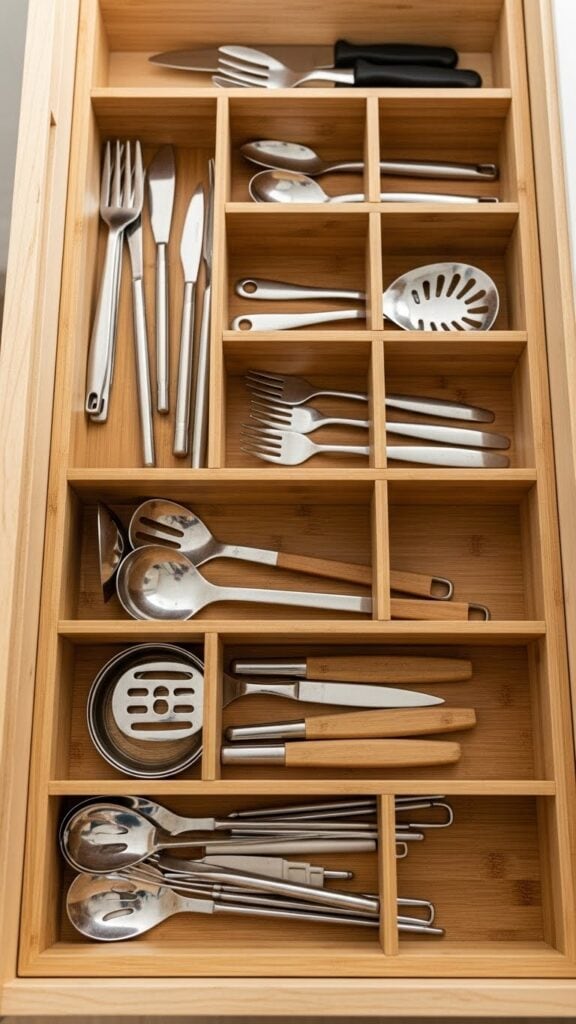
Kitchen drawers are prime real estate, yet they often become chaotic catch-alls for every kitchen tool and random item. A well-organized drawer system can transform your cooking experience by putting the right tools at your fingertips exactly when you need them.
Start by completely emptying every drawer and sorting items into categories. You’ll likely find duplicates, broken items, and things you forgot you owned. Be honest about what you actually use and donate or discard the rest. The goal is to keep only items that serve a purpose in your daily kitchen activities.
Invest in quality drawer dividers or organizers. While you can find inexpensive plastic versions, bamboo or wood dividers are more durable and create a more cohesive, upscale look. Adjustable dividers are ideal because they can be customized to fit any drawer size and reconfigured as your needs change.
Designate specific drawers for specific categories. One drawer for cooking utensils, another for silverware, one for measuring tools and gadgets, and so on. This categorical organization means everyone in the household knows exactly where to find things and where to put them away.
For the utensil drawer, separate items by type and frequency of use. Keep your most-used items—spatulas, wooden spoons, tongs—in the front or most accessible section. Less frequently used specialty tools can go toward the back. Use divided sections to prevent different types of utensils from getting tangled together.
Create a dedicated junk drawer, but make it an organized one. Use small dividers or containers to corral rubber bands, twist ties, pens, notepads, and other miscellaneous items. When everything has a designated compartment, even your junk drawer can be functional and easy to navigate.
For deep drawers, use stacking organizers or tiered systems to maximize vertical space. These work wonderfully for storing food storage containers, small appliances, or bulk cooking supplies.
Consider velvet or non-slip drawer liners to keep organizers in place and prevent items from sliding around when you open and close drawers. These liners also add a touch of luxury and make drawers easier to clean.
Label drawer organizers if you’re sharing your kitchen with family or roommates. Clear labels help everyone maintain the system and put items back in their proper places.
For silverware specifically, use a traditional cutlery tray with separate compartments for forks, knives, and spoons. Place it at the front of the drawer for easy access. If drawer space allows, add a second tier above or behind it for serving utensils or specialty flatware.
Install outlet strips inside deep drawers if you store small appliances there. This allows you to charge or use appliances without pulling them out onto the counter, saving both time and counter space.
Keep a set of measuring spoons and cups in multiple drawers if you have the duplicates. Having measuring tools near your baking supplies, cooking area, and coffee station eliminates the need to hunt for them when you’re in the middle of a recipe.
Finally, maintain your drawer organization by doing a quick reset every few weeks. Spend five minutes returning misplaced items to their proper spots and removing anything that doesn’t belong. This regular maintenance prevents drawers from descending back into chaos.
6. Optimize Vertical Storage to Double Your Kitchen Capacity
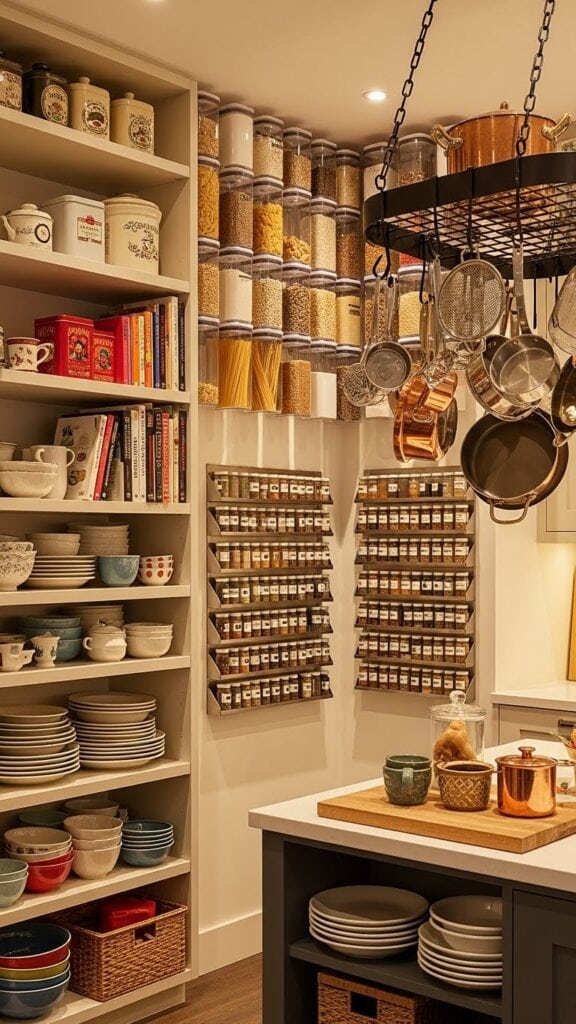
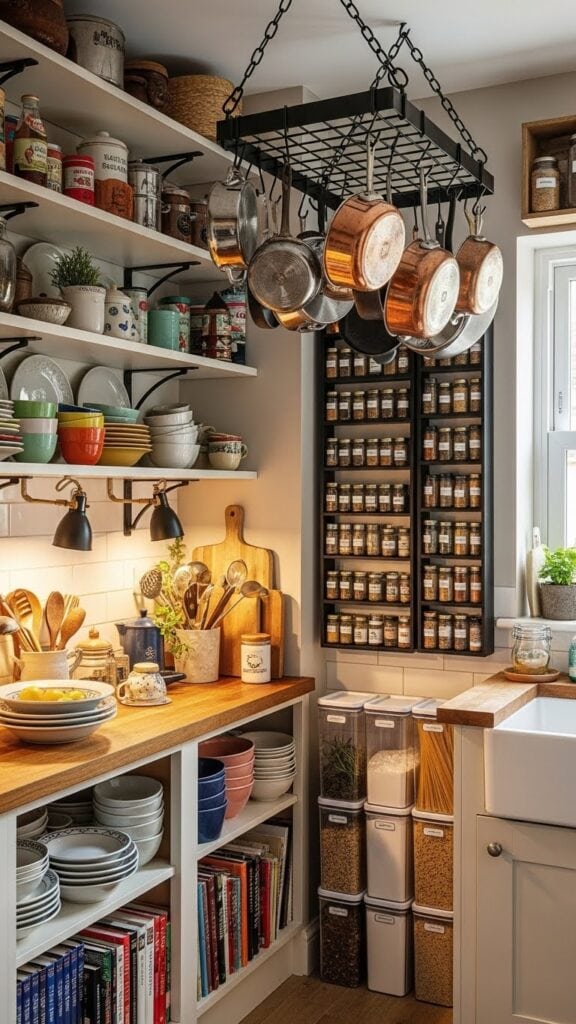
Most kitchens have significant unused vertical space—the area between the countertop and the upper cabinets, above the cabinets, and on empty wall sections. By strategically using this vertical real estate, you can dramatically increase your storage capacity without expanding your kitchen’s footprint.
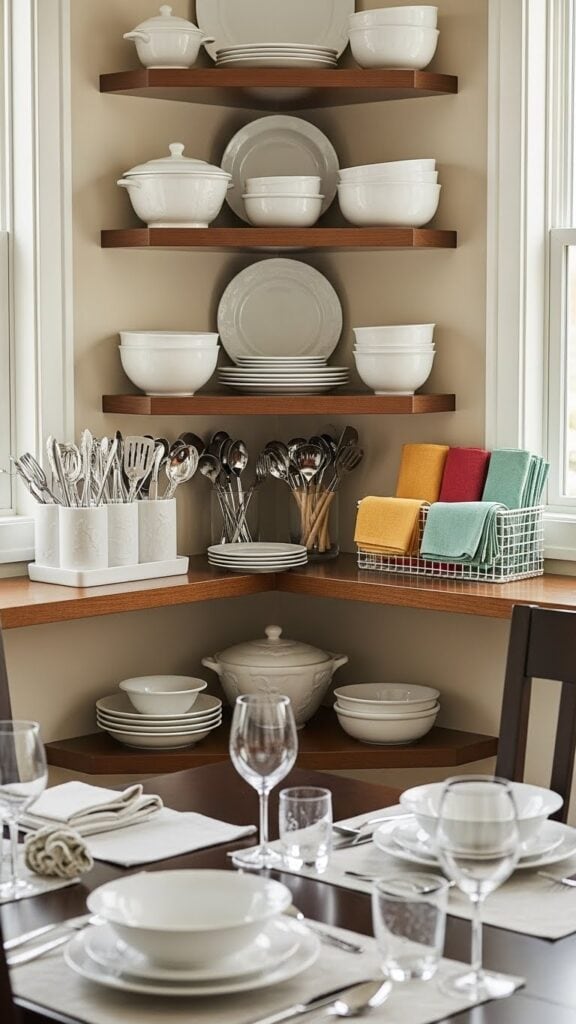
Open shelving is both a design trend and a practical storage solution. Installing floating shelves on empty walls creates display and storage space for dishes, glasses, cookbooks, or decorative items. While open shelving requires you to keep items looking tidy, it also makes everything visible and accessible. Use uniform containers, baskets, or dishes to create a cohesive look.
Install shelves all the way to the ceiling in your pantry or on open walls. Use the highest shelves for items you rarely need, and keep frequently used items at eye level and below. A small step stool makes upper shelves accessible when needed.
Magnetic strips aren’t just for knives—they can hold metal spice tins, scissors, tools, and other metal items. Install them on the wall, inside cabinet doors, or on the side of the refrigerator to keep these items organized and easy to grab.
Hanging pot racks suspended from the ceiling or mounted on the wall remove bulky cookware from cabinets and create a professional kitchen aesthetic. If ceiling mounting isn’t an option, wall-mounted pot racks work equally well and can be installed above counters or stoves.
Use the space above your sink by installing a rack for drying dishes, storing frequently used items, or hanging herbs. This often-wasted space can become highly functional with the right setup.
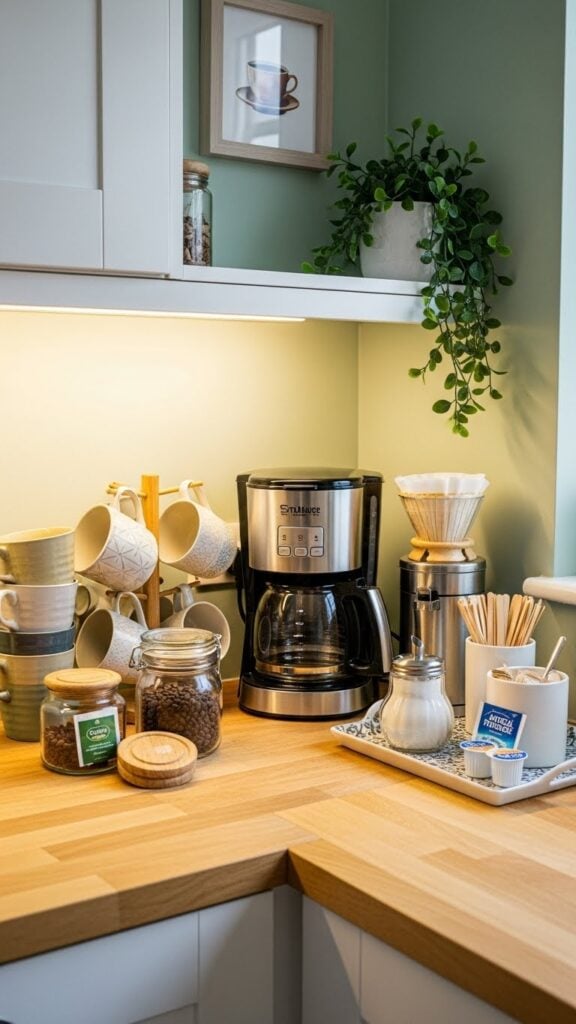
Create a coffee or tea station on a wall using floating shelves, hooks for mugs, and small containers for sugar, stirrers, and other supplies. This vertical organization keeps everything you need in one convenient location.
Install towel bars or hooks at different heights to hang dish towels, aprons, oven mitts, and pot holders. Multiple bars maximize wall space while keeping linens accessible and off the counter.
Use stackable shelf risers inside cabinets to create additional levels of storage. These work particularly well in pantries and cabinets with tall clearances, essentially turning one shelf into two or three.
Hang baskets from the ceiling or under cabinets to store produce, snacks, or frequently used items. Wire baskets allow air circulation for fruits and vegetables while keeping them visible and accessible.
Install a pegboard system on a full wall or backsplash area. This customizable storage solution can hold pots, pans, utensils, cutting boards, and more. Paint it to match your kitchen, and rearrange the configuration as your needs change.
Use over-the-door organizers on pantry doors or cabinet doors to hold spices, cleaning supplies, or food items. These multi-pocketed organizers add significant storage without taking up any floor or shelf space.
Consider a plate rack mounted on the wall for drying and storing dishes. This classic kitchen feature is both decorative and functional, and it frees up valuable cabinet space.
The key to successful vertical storage is ensuring that frequently used items remain easily accessible. Reserve the highest reaches for seasonal items, special occasion pieces, or rarely used equipment, while keeping everyday essentials at comfortable heights.
7. Streamline Your Under-Sink Organization for Maximum Functionality
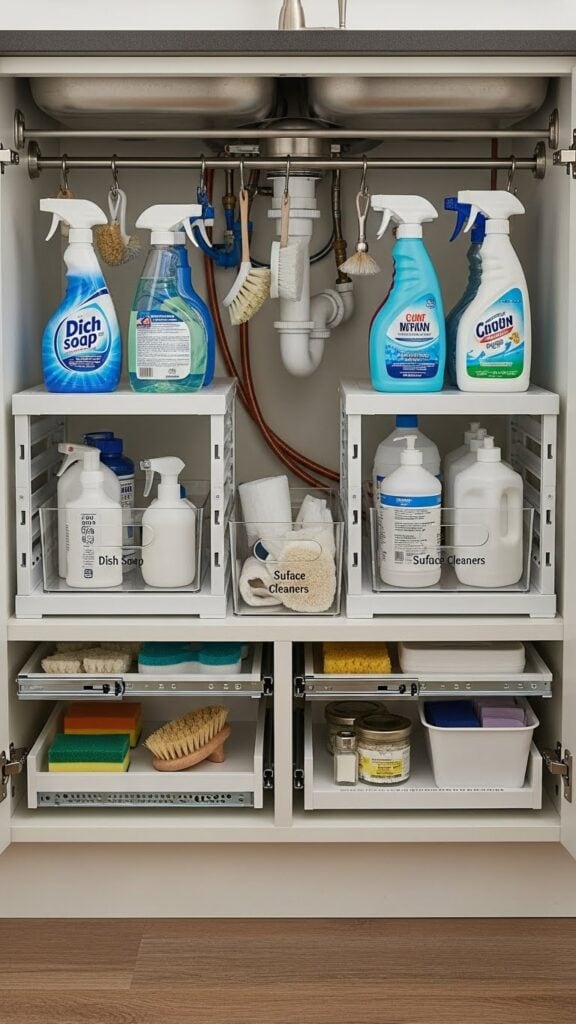
The cabinet under the kitchen sink is notoriously difficult to organize due to plumbing pipes, garbage disposals, and awkward dimensions. However, with creative solutions, this space can become a highly functional storage area for cleaning supplies, trash bins, and more.
Start by measuring around your pipes and taking note of any obstacles. This will help you choose organizers that actually fit your specific space rather than trying to force generic solutions that don’t work with your plumbing configuration.
Expandable shelf organizers that fit around pipes are specifically designed for under-sink storage. These create a second level of storage above the floor of the cabinet, effectively doubling your capacity. Use the upper level for frequently used items like dish soap and sponges, and store backups or less-used items below.
Install a tension rod across the cabinet to hang spray bottles by their triggers. This simple hack keeps cleaning products upright, prevents leaks, and makes them easy to grab. You can install multiple tension rods at different heights to maximize this hanging storage.
Use stackable drawers or pull-out organizers designed for under-sink cabinets. These slide-out systems make it easy to access items in the back without having to remove everything in front. Look for narrow versions that fit around pipes.
Attach a small trash bag holder or grocery bag organizer to the inside of the cabinet door. This keeps bags neatly contained and easy to access when you need them for lining trash bins or other uses.
Consider a pull-out trash and recycling system that fits under the sink. These systems attach to the cabinet door and pull out when you open it, keeping waste bins hidden but easily accessible. Choose a version with multiple compartments to separate trash from recycling.
Use clear, stackable bins to group similar items together—one for sponges and scrubbers, another for dish detergents, one for surface cleaners, and so on. Clear bins let you see what you have at a glance, and they contain any spills or leaks from cleaning products.
Add adhesive hooks to the inside of the cabinet door for rubber gloves, dish brushes, or small cleaning cloths. Every bit of vertical space counts in this challenging area.
Install a tilt-out tray in front of the sink for sponges and scrubbers. This clever solution keeps these items hidden but immediately accessible, and it uses otherwise wasted space.
If you have deep under-sink cabinets, consider installing lazy Susans for items you use regularly. These rotating platforms make it easy to access cleaning supplies without having to reach into dark corners.
Don’t forget about safety if you have children. Install childproof locks on under-sink cabinets that contain cleaning chemicals or other hazardous materials. Store the most dangerous products in a locked cabinet elsewhere if possible.
Line the cabinet bottom with a waterproof mat or liner to protect against leaks and spills. This makes cleanup easier and prevents water damage from small drips around the plumbing.
Finally, implement a regular maintenance routine for this area. Every few months, remove everything, wipe down surfaces, check for leaks, and purge any products you no longer use or that have expired.
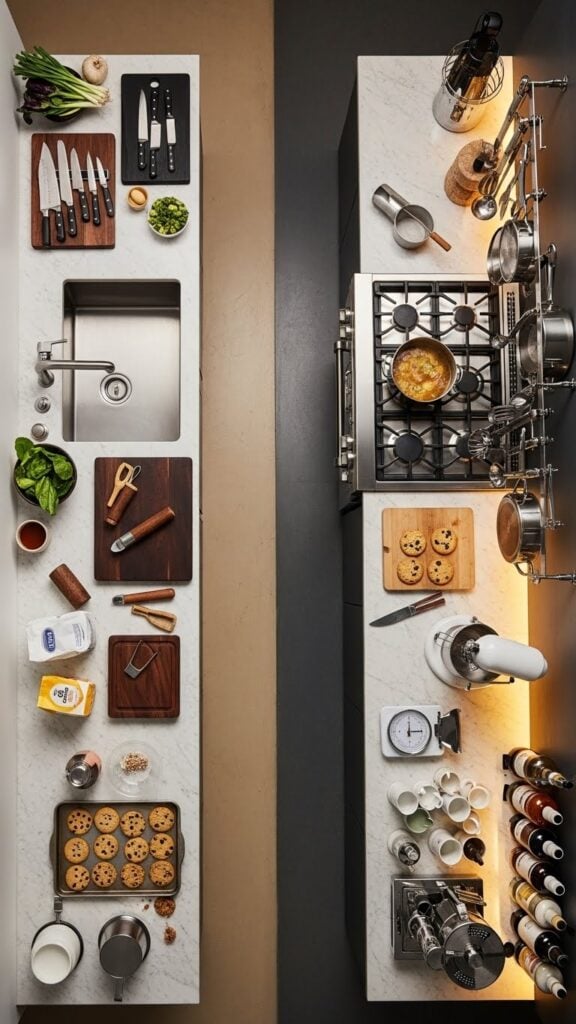
8. Designate Zones for an Intuitive Kitchen Workflow
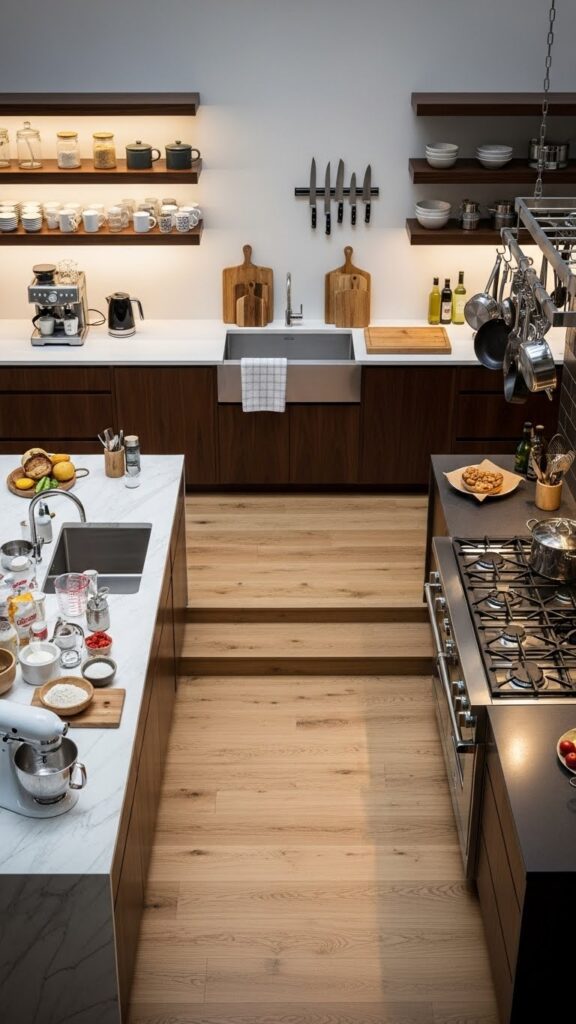
The most organized kitchen is one where the layout supports your natural workflow. By creating designated zones for different kitchen activities, you can minimize movement, reduce frustration, and make cooking more enjoyable and efficient.
The concept of kitchen zones is simple: group items by function and store them where you’ll use them. This means baking supplies near your prep area, cooking utensils near the stove, and coffee supplies near the coffee maker. When everything you need for a task is in one location, you waste less time and energy hunting for scattered items.
Prep Zone: This area, typically near the sink, should contain cutting boards, knives, mixing bowls, measuring tools, and colanders. Store these items in drawers or cabinets within arm’s reach of where you’ll be chopping vegetables and preparing ingredients. Keep a small trash bowl or compost container nearby for food scraps.
Cooking Zone: Center this zone around your stove and oven. Store pots, pans, cooking utensils (spatulas, wooden spoons, tongs), pot holders, and cooking oils here. Wall-mounted storage or countertop crocks keep frequently used utensils immediately accessible while you’re at the stove.
Baking Zone: If you bake regularly, dedicate a cabinet or section of your pantry to baking supplies. Store flour, sugar, baking powder, chocolate chips, measuring cups, mixing bowls, and baking pans together. If space allows, keep your stand mixer or hand mixer here too, or at least nearby for easy access.
Cleaning Zone: This zone naturally centers around the sink. Store dish soap, sponges, scrubbers, dish towels, and dishwasher detergent here. Under-sink storage for cleaning supplies and trash/recycling bins makes sense in this zone.
Beverage Station: Create a dedicated area for coffee, tea, and other beverages. Keep mugs, the coffee maker, filters, coffee or tea, sugar, and stirrers all in one location. This is especially helpful for morning routines when you want to make coffee without thinking.
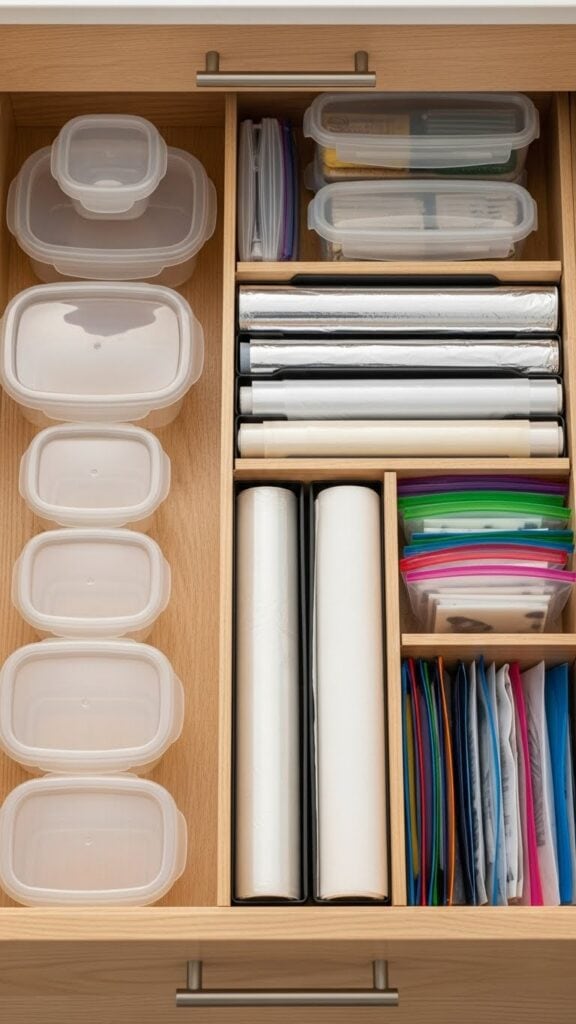
Food Storage Zone: Designate one area for food storage containers, plastic wrap, aluminum foil, and bags. Keeping these items together in a single drawer or cabinet means you always know where to find them when you’re storing leftovers.
Serving Zone: Store serving platters, bowls, utensils, and napkins together, preferably near the dining area if possible. This makes setting the table and serving meals more efficient.
As you establish these zones, pay attention to the “golden triangle” principle—the relationship between your sink, stove, and refrigerator. These three points form the core of most kitchen workflows, and your zones should support easy movement between them.
Label shelves or drawers if you’re sharing your kitchen with others. Clear labels help everyone understand the system and maintain the organization.
Be flexible with your zones. If you find yourself repeatedly moving items from where they’re “supposed” to be, that’s a sign the system isn’t working. Adjust based on your actual behavior and usage patterns rather than trying to force a theoretical ideal.
Review and refine your zones periodically. As your cooking habits change, your zones may need to evolve too. What worked for you as a single person might need adjustment when you have a family, and your needs as a frequent entertainer differ from those of someone who cooks simple meals for one.
Conclusion: Creating Your Dream Kitchen Organization System
Transforming your kitchen from chaotic to organized is one of the most rewarding home improvement projects you can undertake. Unlike a renovation that requires significant time and money, organizing your kitchen can be accomplished in stages, on any budget, and with immediate results that improve your daily life.
The eight strategies outlined in this guide—mastering pantry organization, revolutionizing cabinet space, creating DIY organizers, maximizing small spaces, implementing drawer systems, optimizing vertical storage, streamlining under-sink areas, and designating functional zones—provide a comprehensive framework for kitchen organization. You don’t need to implement all of them at once. Start with the area that causes you the most frustration or the strategy that resonates most with your needs.
Remember that organization is personal. What works brilliantly in someone else’s kitchen might not suit your cooking style, family size, or space constraints. The key is to observe how you actually use your kitchen and design systems that support your natural workflows rather than fighting against them.
Successful kitchen organization isn’t about achieving Pinterest-perfect aesthetics, though a beautiful kitchen is a nice bonus. It’s about creating a space that functions so smoothly you don’t have to think about where things are or waste time searching for what you need. It’s about reducing the friction between the desire to cook a meal and actually doing it. It’s about creating a kitchen that invites you in rather than stressing you out.
Start small, be consistent, and don’t be afraid to experiment. Try a system for a few weeks, and if it’s not working, adjust it. The perfect organization system is the one you’ll actually maintain, not the one that looks the best in photos.
Your kitchen should work for you, not against you. With these organization ideas as your foundation, you can create a kitchen that’s efficient, beautiful, and perfectly suited to your life. The result will be less time spent searching for items, less frustration when cooking, and more enjoyment of one of the most important spaces in your home.
